

How to Sit the Trot: A Biomechanics-Focused Guide for Adult Amateur Dressage Riders
Why the Sitting Trot Feels So Hard (and How to Fix It)
If you spend your weekdays at a desk and your weekends in the saddle, you already know the feeling: the moment your riding instructor says “now sit the trot,” your body tenses, your hips lock, and you begin bouncing like a tennis ball on concrete. To sit the trot well, relax through your hips and core so they stay soft enough to absorb your horse’s motion; then your pelvis can follow it like a slow rolling wave instead of bracing, gripping, and bouncing. It is not a lack of toughness. It is physics. And it’s not easy!
During every stride of the trot, your horse’s back lifts and drops twice. Each diagonal push-off sends a wave of vertical force through the saddle, and when you land on the downward phase without absorbing it, you slam into the horse’s spine. The horse hollows to escape the impact, the movement gets sharper, and the cycle escalates. Relaxation is key to mastering the sitting trot, yet everything about the experience seems engineered to make you grip harder.
Before we continue, let’s set a few definitions straight.
- The rising trot (or posting trot) has you lifting out of the saddle on alternating diagonals, sparing the horse’s back from continuous load.
- The sitting trot, sometimes called the seated trot, keeps your seat in the saddle every stride.
- An independent seat is the ability to control your own body, maintain your own balance, and give aids through your seat, legs, and hands without any one of those systems propping up the others.
Every dressage rider eventually needs to sit the trot because movements like shoulder-in, half-pass, and collected work demand continuous, nuanced communication through the seat bones, and learning it correctly improves balance, control, and comfort for both horse and rider while reducing tension and overuse on both sides. Learning to sit the trot will help you show at second level and beyond as all movements must be done in sitting trot.
You know you’re bouncing when any of the following sounds familiar:
- Your pelvis slams into the saddle with an audible thud on every beat.
- Your feet jam downward into the stirrups, heels locked, toes braced.
- Your hands jerk upward, catching in the horse’s mouth each stride.
- Your lower back aches within minutes, or your thighs burn from gripping.
- For some riders their heads moves up and down as your whole body is absorbing the movement.
This article is written for adult amateur dressage riders, especially the desk-bound rider trying to build a softer, more effective seat. It breaks down the biomechanics behind the bounce, the most common reasons riders stiffen, off-horse exercises for hip mobility and core strength, a progressive in-saddle plan for sitting trot, and when professional coaching will help you progress faster. At White Fences Equestrian Center near Austin, TX, we specialize in helping adult amateurs develop a soft, effective seat through expert dressage training and personalized instruction.
Before diving in, here are three immediate wins to experiment with at your next ride:
- Breathe audibly on the exhale. Holding your breath locks your diaphragm and stiffens your ribs.
- Unbrace your thighs. Imagine your thigh bone is heavy and simply draping over the saddle, not clamping it.
- Shorten your sitting-trot intervals. Sit for only a few strides, then return to rising trot. Quality always beats quantity.
Biomechanics of Sitting the Trot: Horse, Rider, and Why You’re Bouncing
Understanding the mechanics of the trot will immediately make your sitting trot less mysterious and far easier to improve. Once you see why your body does what it does, you can stop fighting the bouncy movement and start working with it.
The Horse’s Side
The trot is a two-beat, diagonal gait with a moment of suspension between each beat. The horse’s back lifts as one diagonal pair pushes off the ground, then drops as weight shifts to the opposite pair. Compare a flatter, working trot to a powerful, springy medium trot: the latter generates more vertical amplitude and rotational force, which is why it is dramatically harder to sit. Different horses also vary in how much back swing they produce, making sitting trot feel wildly different from one mount to the next.
Here is the critical point many riders overlook: a horse’s back must be rounded for a rider to sit the trot comfortably. When a horse makes the effort to push from behind, lift through the withers, and swing its back, the motion becomes wave-like and followable. A horse with a hollow, stiff back drops sharply and offers nothing for the pelvis to track. The horse’s back must be strong and supple for effective sitting trot, which means correct schooling-frequent transitions, properly ridden lateral work, and a well-fitted dressage saddle-directly determines how sittable the trot feels. Research confirms that at least 35% of ridden horses experience some form of back pain, often linked to saddle fit and pressure distribution issues.
The Rider’s Side
Now for your side of the equation. Your pelvis sits on two seat bones, connected above by the lumbar spine and below by ball-and-socket hip joints. The hip socket is designed for an enormous range of motion-21 muscles are involved in hip movement for riding alone. In an ideal sitting trot, these hip joints act as shock absorbers, letting the pelvis follow the horse’s rhythmic motion while the upper body stays quietly organized.
The problem for most adult amateurs is what we call “locked hips and loose spine.” Hours of desk sitting shorten the hip flexors, deactivate the glutes, and stiffen the lumbar region. When you get on a horse, your tight hips cannot absorb the horse’s movement, so the force travels straight up into an unsupported lower back. Riders with tight hips often experience lower back pain, and the discomfort only worsens the tension spiral. Tight muscles and pain memories cause the body to “armor up,” making the hips even more rigid and the seat bones jab harder into the saddle.
What should happen instead: your hips should move rhythmically with the horse’s back, tracing a subtle ellipse or figure-8 pattern-forward and back, with a slight tilt and rotation. The illusion of stillness you see in an advanced dressage rider comes not from rigidity but from the torso remaining organized while the pelvis quietly follows the horse’s motion below. Relaxed hips are essential to absorb the upward and side-to-side motion of the horse, and hip suppleness is essential for a successful sitting trot.
Use this self-diagnosis checklist the next time you ride:
- If you feel jolting in your lower back, you’re probably locking your hip joints and letting your spine take the shock.
- If your knees squeeze inward, you’re gripping with your thighs, which lifts your seat bones off the saddle and guarantees bouncing. Avoid gripping with your knees or thighs to prevent bouncing in the seat.
- If your heels push down hard, you’re bracing into the stirrups, turning your lower leg into a lever that launches you upward.
- If your hands bounce, your arms are rigid and your spine connects the saddle impact directly to your fingers.
Riders need to stabilize their lower back with abdominal muscles, not by clenching a six-pack, but by engaging the deep transverse abdominis and multifidus that wrap the torso like a corset. Engaging your core stabilizes your lower back while riding, and a strong core stabilizes the pelvis during the sitting trot. A strong core stabilizes the pelvis for an independent seat, and an independent seat allows for better communication with the horse through nuanced weight and balance aids rather than crude rein pressure.
An eight-week study of adult dressage riders (average age approximately 41) found that just 20 minutes of core training three times per week reduced left-right saddle pressure asymmetry by roughly 0.36 kPa and increased the horse’s stride length by about 8.4 percent. The takeaway is clear: the rider’s fitness off the horse makes a big difference in what happens on it.
Slow, thoughtful practice can retrain these patterns. Your nervous system learned to brace; it can also learn to release.
Unmounted Exercises: Building a Softer Seat Before You Get in the Saddle
Some of the fastest improvements to your sitting trot will start in the barn aisle or your living room, not in the arena. Using off-horse exercises can improve flexibility and strength for riding, often yielding noticeable results within four to eight weeks of consistent practice.
The goal of unmounted work is threefold: lengthen tight hip flexors, wake up dormant glutes and hamstrings, and teach the pelvis to move independently while the spine stays supported. Hip suppleness is essential for following the horse’s movement, and these drills target exactly that. Hip flexibility allows the rider to absorb the horse’s movement rather than fight it.
Backwards Walking Drill (3–5 Minutes)
Stand tall in a hallway or the barn aisle. Keep your pelvis upright and engage your low abdominals as if lightly zipping up the front of your breeches. Step slowly backward, feeling your glutes and hamstrings fire with each step. Focus on letting the front of the hip gently open instead of folding at the waist.
Connection to the saddle: This exercise trains the hip extensors to activate and the hip flexors to lengthen, making it far easier to let your thigh bone drop long in the saddle rather than clamping upward.
Doorframe or Wall “Pelvis Anchor” Exercise
Stand with your sacrum and lower back gently pressed against a wall or doorjamb. Without losing that contact, slide one leg slowly behind your body, extending through the hip socket. You should feel a stretch across the front of the hip while your lower back remains stable against the wall. Perform 8–10 repetitions per leg.
Connection to the saddle: This drill teaches your pelvis to stay neutral while your legs move independently-the exact skill that prevents a chair seat and lower back collapse during sitting trot. It also highlights any asymmetry between your left and right side.
Supine Pelvic Tilts and Small Bridges (On a Mat)
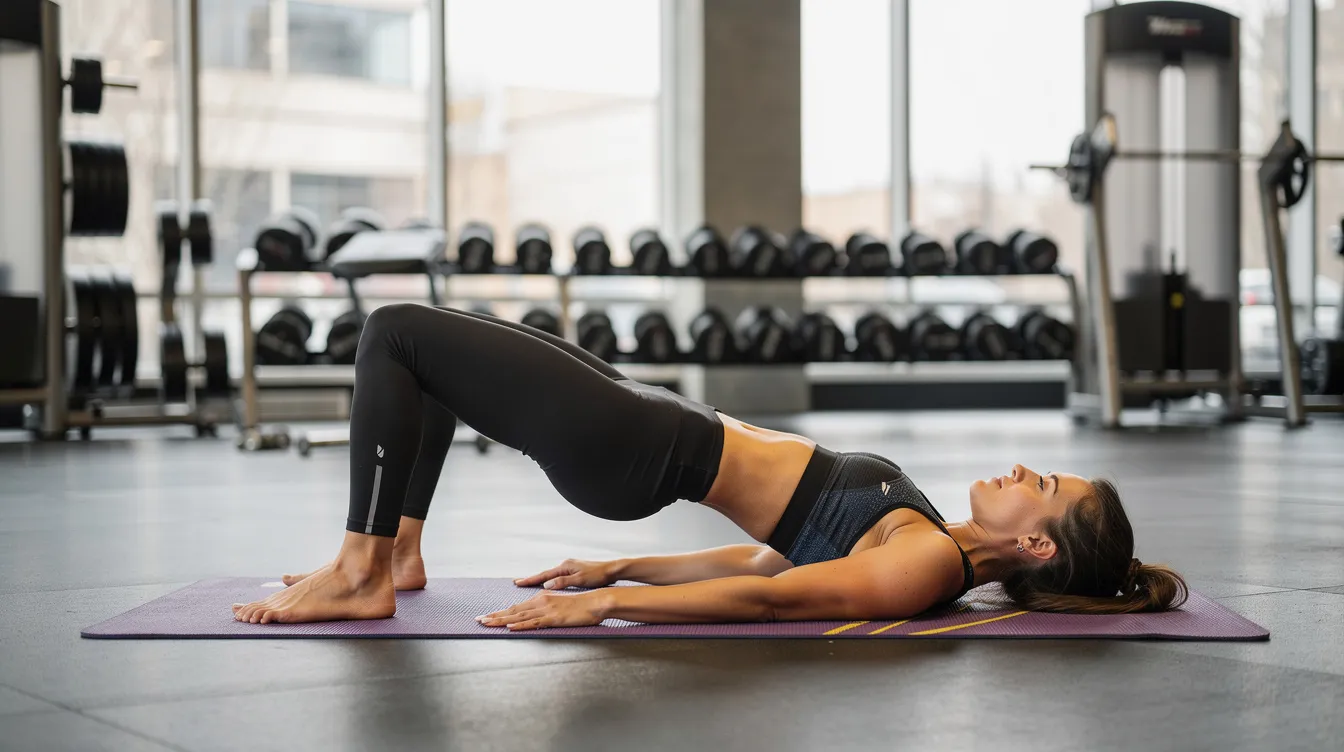
Lie on your back with knees bent and feet flat on the floor. Gently rock your pelvis forward and back, feeling how your seat bones press into the ground at different angles. Then add small bridges: press through your heels, engage your glutes (not your lower back), and lift your hips a few inches. Hold for two seconds, lower with control. Aim for two sets of 12 repetitions.
Connection to the saddle: Bridges build core strength and hip extensor power. The pelvic tilt portion develops the subtle “rock” your seat needs to follow the horse’s stride without slamming.
Dead Bug for Torso Stability
Lie on your back with arms extended toward the ceiling and knees bent at 90 degrees. Slowly lower your right arm overhead and your left leg toward the ground, keeping your ribs stacked over your pelvis and your lower back pressed into the mat. Return and switch sides. Perform 8 repetitions per side with a slow exhale on each extension.
Emphasis on breathing here is critical: slow exhales soften the rib cage and prevent the bracing pattern that locks up your riding posture. Engage your core to stabilize your upper torso without becoming stiff-the dead bug teaches exactly this balance.
Connection to the saddle: A more stable torso means less compensatory gripping with your thighs, which directly reduces bouncing.
Consistency Over Intensity
You do not need hour-long gym sessions. Research and practical experience both point to the same prescription: 10–15 minutes of these unmounted exercises, 3–4 times per week, will produce measurable change within four to eight weeks. Riders who board their horses or train at White Fences Austin often build core strength by incorporating these drills into their warm-up routine before lessons, turning dead time into seat development.
In-Saddle Progression: From Rising Trot to Confident Sitting Trot
Never “just sit and suffer” through endless laps of bouncing. That approach punishes the horse’s back, reinforces your bracing patterns, and erodes your confidence. Instead, use a structured progression that blends walk, rising trot, and short sitting-trot intervals to protect both horse and rider while building genuine muscle memory.
Warm-Up Plan
Begin every ride with 5–10 minutes of free walk. Focus on breathing deeply and feeling your seat bones following the gentle lift and drop of the horse’s back. Let the motion rock your pelvis without any effort to control it. To sit the trot effectively, focus on maintaining a deep and relaxed seat-and the walk is where you rehearse that feeling.
After the walk, spend a few minutes in rising trot. Research confirms that rising trot produces significantly lower vertical force on the horse’s back than sitting trot, so this phase warms the horse’s muscles and lets you establish rhythm with a vertical upper body and soft elbows before adding the demand of sitting.
Phase 1: Sprinkles of Sitting Trot
On a 20-meter circle in a balanced working trot, sit for just 3–4 strides, then return to rising trot. Think of “melting” into the saddle rather than lowering yourself with muscle force. Imagine your weight dropping through your pelvis like sand through an hourglass. Repeat several times each direction. Short intervals of sitting trot followed by walking helps improve muscle memory far more effectively than grinding through long stretches of bouncing.
Phase 2: Short Lines of Sitting Trot
Once the sprinkles feel manageable, extend to a full long side or a diagonal line. Rise again in the corners where the horse naturally rebalances. Pay attention to whether your hips are following forward and back or simply bouncing up and down. Counting the horse’s trot beats aloud-“one-two, one-two”-can help you maintain rhythm and stay synchronized with the gait. Practice transitions between rising and sitting to improve control and balance in the trot.
Phase 3: No-Stirrup Work on the Longe Line
This is where progress accelerates….and where some riders don’t want to do. Two to three short sets of sitting trot without stirrups on a well-balanced schoolmaster, ideally on a longe line with a trusted riding instructor controlling the horse, will transform your seat faster than almost anything else. Riding on a lunge line without reins allows focus on seat and balance exclusively.
Keep your hands on a neck strap or knotted reins. Drop your stirrups entirely. Dropping stirrups helps develop an independent seat and better balance because it removes the temptation to brace. Riding without stirrups helps develop a deeper seat by forcing you to find stability through your core and the drape of your legs rather than your feet. Practice without stirrups to enhance your independent seat whenever your trainer can lunge you safely.
What to Do with Each Body Part
| Body Part | What to Do | What to Avoid |
|---|---|---|
| Pelvis and hips | Allow them to follow the horse’s motion as if you are matching a slow, rolling wave. Your hips should swing with each stride. | Clamping, tilting to one side, or holding rigidly still. |
| Legs | Keep them long and softly draped. Weight flows into the stirrup from the hip, not by pushing down. The lower leg rests quietly at the girth. | Gripping with the knee, pinching with the thighs, or locking the ankle. |
| Core and upper body | Imagine a corset of muscles around the waist supporting a tall ribcage. Shoulders stay stacked over hips. Maintain a balanced posture by keeping your ears, shoulders, hips, and heels in a straight line. | Hollowing the lower back, collapsing the chest, or arching into a rigid “military” posture. |
| Hands and arms | Soft elbows, elastic contact. Use the seat to influence tempo and balance instead of pulling the reins when things feel bouncy. | Stiff, straight arms that transmit every bounce into the horse’s mouth. |
Your riders should follow the horse’s rhythmic motion by allowing their pelvis to swing rather than clamp. When the horse makes a bigger stride or changes balance, stay balanced by breathing and allowing your hip joints to open and close. The pubic bone should point gently forward, not tuck under (which creates a chair seat) or tip forward (which hollows the spine connects to the saddle at the wrong angle).
Protect the Horse
Not all horses are ready to be sat for long periods. Suggest limiting sitting trot on young or weak-backed horses to short sections until they can carry more weight behind and the horse’s back development allows sustained engagement. When a horse is not yet engaged properly through the hindquarters, sitting trot can cause the back to hollow and the horse to rush-a clear signal to return to rising trot. Alternate between rising and sitting in every schooling session. Even advanced horses benefit from rest periods. You can also use ground poles at walk to encourage the horse to lift and round its back before asking for trot work.
Your ability to trot smoothly in a seated trot depends as much on the horse’s training as your own. On different horses, you will feel dramatically different levels of difficulty-this is normal and does not mean you have regressed.
When to Ask for Help: Personalized Coaching at White Fences Austin
Even the most technically detailed article cannot replace a skilled trainer watching how your body and your horse move together in real time. Reading about biomechanics gives you the map; personalized coaching gives you the GPS correction when you veer off course. Consider seeking one-on-one support if you experience any of these:
- Persistent lower back or hip pain when trying to sit the trot, despite regular unmounted exercises.
- A horse that consistently rushes, hollows, or pins ears when you sit-this may indicate saddle fit issues, back soreness, or a riding posture problem a trained eye can diagnose.
- Difficulty keeping your hands steady, or feeling out of control at anything beyond a slow jog-like trot.
A professional dressage trainer at White Fences Equestrian Center typically addresses these challenges through lunge lessons on a steady school horse so the rider can drop reins and focus entirely on seat and balance. On-the-spot adjustments to stirrup length, saddle balance, and rider alignment make a big difference that no mirror or video can replicate. Trainers also assign tailored homework-custom unmounted exercises and in-saddle patterns calibrated to your specific asymmetries and the demands of your particular horse.
If you are an Austin-area rider ready to build a truly independent seat, we invite you to schedule a private dressage lesson or a facility tour to experience our covered arena, quality footing, and calm training environment designed for focused seat work. Whether you ride your own horse, board with us, or are looking for a well-schooled lease horse, our program is built around the adult amateur who wants real, lasting progress.
A Final Word
Mastering the sitting trot is a process measured in months of deliberate practice, not a single breakthrough moment. Every small gain in softness-a fraction less grip in the thigh, one more relaxed exhale, a few strides where you genuinely feel the horse’s movement carry you-is a direct gain in communication with your horse. Build your understanding of biomechanics, commit to smart unmounted exercises that build core strength and hip mobility, and pair that work with thoughtful in-saddle practice. Ideally, do all of it with expert eyes on the ground who can see what you cannot feel yet.
Your seat is the foundation of every aid you will ever give. It is worth the patience.